**Group members participating:** Tine Hansen, Daniel Moltzen, Mads Eriksen, Lars Høeg.
**Activity duration:** ?? hours.
## Structure
The report is structured as follows;
Each exercise contains the following sections;
- Goal: Where we describe the goal of the specific exercise.
- Plan: How we are planning to fulfill the goal.
- Results: Here we will present the findings and observations.
- Implemented Code: The software that we used. Sometimes illustrated in the results instead.
- Conclusion: And lastly we will conclude on the findings in relation to the goal and plan.
## Exercise 1 - LEGO vehicle that exhibits a single behavior
### Goal
The first goal is to observe and describe the behavior of the robot running the program AvoidFigure9_3.java[1]. Secondly, to change the program accordingly to assignment.
### Plan
Our plan is to build the “expressbot with extensions” as described in [2], see picture 1. We will then change the program so that the robot drives backward when “leftDistance”, “frontDistance”, and “rightDistance” are less than “stopThreshold”. Lastly, the robot should turn about 90 degrees when the values from both frontdistance, leftdistance and rightdistance is below 30.
Picture 1: The robot called expressbot with extensions.
### Results
[](http://www.youtube.com/watch?v=0X5SQltdXz0)
##### Video 1 - Ultrasonic vehicle, that avoid obstacles[3].
The video shows how the NXT Robot works with the avoidFigure9_3.java program[1]. In this experiment the car keeps driving until it reaches a distance lower than 30 cm (according to the ultrasonic sensor) to the object in front of it. To overcome this obstacle it first turn left and take a sample reading of the distance, hereafter it turns right and takes a sample reading of the distance in that direction. Ultimately it then keeps going forward in the direction where the sample value is highest.
When it reaches a corner, the readings from both left and right is below 30, and therefore it keeps first looking left and then right in an unlimited loop, which means that it will never drive away from the corner again, as seen in Video 2.
[](http://www.youtube.com/watch?v=Wn6aq8CE_xo)
##### Video 2 - Ultrasonic vehicle, that fails[4].
Implementing the code below, makes the car turn 90 degrees when the values from both frontdistance, leftdistance and rightdistance is below 30.
##### Codesnippet 1, changes to AvoidFigure9_3.java[5]
As seen in Video3 below, the car now turns away from the corner instead of getting trapped.
[](http://www.youtube.com/watch?v=vxkc_psuFeE)
##### Video 3 - Ultrasonic vehicle, with changes[6].
### Conclusion
In the base code, the Legocar would get trapped in a loop reaching a certain condition where leftdistance and right distance got below 30 for every reading. To overcome this obstacle, we have implemented a code, where, if such a situation is met, the Legocar now turns away from the wall and can keep driving without getting stucked.
## Exercise 2 - Behaviors as concurrent threads
### Goal
The goal with this exercise is to look at the behaviors and to get an understanding of concurrent threads.
### Plan
The program RobotFigure9_9.java[1] will be used in this exercise. It implements the control behavior network from figure 9.9 in [7]. We will observe and describe the conditions that triggers the different behavior of the robot. A deeper look into the code will be performed to achieve a better understanding of the different threads that each controls a single behavior.
From watching the behaviour and the implemented code, we see that the threshold for the light value and sonar distance is what decides the car behaviour, whereas cruising does not seem to play a major role in how the car avoid obstacles but only stands for the forward command.
[](http://www.youtube.com/watch?v=6-VHqw5FNXI)
According to figure 9.9, the method Avoid is the most “important”. It will take control of the car if it reaches a value below 30 and decide which way to go to avoid the obstacle. No matter if it measures a lightvalue above the light threshold. If there are no obstacles within reach, the Follow method will take control of the car if it registers a lightvalue above its threshold. At last, if both Avoid and Follow, do not measure any values that triggers their threshold the car will cruise.
As we can see in video 4, it cruises until it reaches an obstacle. The reason for this must be, that on start, the lightvalue must have been so high that it does not reach its threshold and therefore keeps cruising until the Avoid method is triggered by a nearby obstacle.
We also tested the Legocar with only the Cruise method implemented. Using this, the car just drives forward with the desired motorpower on both motors.
After that, we tested the Legocar with both the Cruise and Follow methods. This test can be seen on video 5 below, which shows that the car cruises from the beginning (meaning no light value above its threshold). When turning on light in front of it, the method changes to Follow. When removing the light, the lightvalue threshold is reset to the environment so when we put a light in front of Legocar again, the Follow method is triggered. This supports the observed behaviour in video 4 as well as the Rug Warrior’s control network described in figure 9.9.
[](http://www.youtube.com/watch?v=HoA4X3ayZ7c)
##### Video 5: Cruise+Follow only.
### Conclusion
We have investigated and observed the behavior of the program RobotFigure9_9.java that implements the some of the behaviors from Rug Warriors control network. We have learned how the network is applied in the program and how the inner workings function.
Moreover this behavior with the different infinite-states seems as [7] writes about. Like the robot is running the program as parallel operations.
## Exercise 3 - Add an Escape behavior
### Goal
We want to implement the Escape behavior in the RobotFigure9_9.java program.
### Plan
By using the implementation of Escape in IC as described on page 305 of [7], we will write a program that implements the behaviour.
### Results
The escape behavior will allow the robot to escape from a collision that the other sensors might have overseen. With an escape behavior the robot should get the ability to not get stuck in a place where the behavior of the other sensors is not effective.
[](http://www.youtube.com/watch?v=1lsKNla-ex0)
##### Video 6: Escape Behavior.
As one can in see in the video the robot reacts when hitting an obstacle and turns away. The vehicle can differ between if it is bumped from the left, right or center.
### Implemented code:
The code that we implemented to support the escape behavior is shown in the below code snippet.
```
public void run(){
while (true){
leftBumperStatus = leftBump.isPressed();
rightBumperStatus = rightBump.isPressed();
if (leftBump.isPressed() && rightBump.isPressed()){
// drive backwards and then turn left
car.backward(power, power);
Delay.msDelay(ms);
car.forward(power, 0);
Delay.msDelay(ms2);
}
else if(leftBump.isPressed()){
car .backward(power, power);
Delay.msDelay(ms);
car.forward(0, power);
Delay.msDelay(ms2);
}
else if(rightBump.isPressed()){
//drive backwards and turn left
car .backward(power, power);
Delay.msDelay(ms);
car.forward(power, 0);
Delay.msDelay(ms2);
}
else {
car.noCommand();
Delay.msDelay(ms);
}
```
##### Codesnippet 2: Escape.java [11]
### Conclusion
We saw that the escape behavior allows the robot to escape from a collision that the other sensor might have over seen. It can detect three types of collisions; a front bump, left bump and right bump.
## Exercise 4 - Add a third motor to turn the light sensor
### Goal
The goal in this exercise is to implement a third motor that controls the light sensor. This is used to get readings from the left and right instead of turning the whole vehicle.
### Plan
We are planning to do this by re-implementing the follow behavior using a motor that controls the light sensor.
### Results
We have expanded the Follower class to obtain a light sensor that rotates on a horizontal motor to receive left and right light values from the environment. It works similarly to the existing program (RobotFigure9_9.java[1]) where the Legocar should turn right and left to obtain the light values and hereafter drive towards the area with most light.
[](http://www.youtube.com/watch?v=ISU8eYocQm4)
#####Video 7: Motor Powered Light Sensor
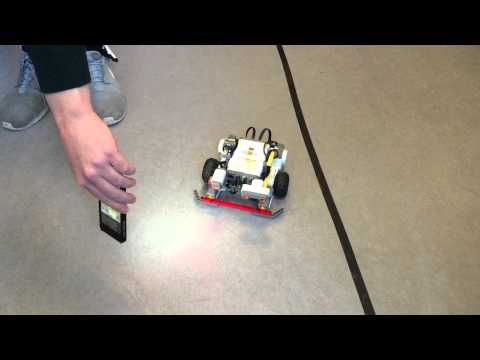
In video 7, we see that, we place a hand above the light sensor to reach a low threshold, which means that the Legocar should stop and calculate the light levels to the right and left very often. What we also observe is that the Legocar make steeper turns if the difference between the two measured light values is high. This is done by calculating the delta and afterwards send it to the motors. What we also see, is that the source of light needs to be within 5-10 cm before we will see a notable reaction from the car. Otherwise, it just seem like cruise control, even though we see that the light sensor measures value it just keeps going straight ahead. The reason to this must be due to a limitation within the lightsensor. The light values must decrease drastically even though the light is only 40-50 centimeters away.
### Implemented code:
Below is a snippet of the code that we implemented when using a motor powered light sensor.
```
class Follow extends Thread
{
private SharedCar car = new SharedCar();
private int power = 60, ms = 500;
LightSensor light = new LightSensor(SensorPort.S4);
int frontLight, leftLight, rightLight, delta;
int lightThreshold;
public Follow(SharedCar car)
{
this.car = car;
lightThreshold = light.getLightValue();
}
public void run()
{
while (true)
{
// Monitor the light in front of the car and start to follow
// the light if light level is above the threshold
frontLight = light.getLightValue();
while ( frontLight <= lightThreshold )
{
car.noCommand();
frontLight = light.getLightValue();
}
// Follow light as long as the light level is above the threshold
while ( frontLight > lightThreshold )
{
// Get the light to the left
getTurnLight();
// Follow light for a while
delta = leftLight-rightLight;
car.forward( power+delta, power-delta);
Delay.msDelay(ms);
frontLight = light.getLightValue();
LCD.drawInt(frontLight, 1, 4);
}
car.stop();
Delay.msDelay(ms);
}
}
public void getTurnLight(){
car.stop();
Motor.A.rotate(45);
Delay.msDelay(ms);
leftLight = light.getLightValue();
Motor.A.rotate(-90);
Delay.msDelay(ms);
rightLight = light.getLightValue();
Motor.A.rotate(45);
}
}
```
##### Code snippet 2: Exercise.java [13]
### Conclusion
When we ran the code and observed the behaviour of the Legocar, we saw that the lightsource had to be within a distance of 5-10 cm from the lightsensor to get a noticeable turn toward the light source. Having in mind that the two values measured, right and left, where very different since one side contained almost no light and the other extreme light, we hoped to see a greater reaction no matter if the light source where close to, or further away from the light sensor. Yet, this did not happen.
Although, we observed that the Follow class was prioritized above the Cruise function which is in line with figure 9.9. This is seen more clear when observing the robot running, namely due to the lack of forward movement when the movable light sensor is taking light measurements.
